
A complete breakdown of the screen printing plate-making process: every step from screen to finished product is full of details.
I. Preparation: Laying a solid foundation leads to twice the result with half the effort
The first step in plate making is to lay a solid foundation, and no detail can be overlooked.
1. Select the appropriate screen : Select a screen with the corresponding mesh count according to the printing requirements, and also consider the screen material (such as stainless steel, polyester, etc.). Different materials have different focuses in terms of tension and durability.
2. Check the quality of the screen : Ensure that the screen is flat and undamaged, and that the surface is clean and free of impurities. This is a prerequisite for the subsequent coating of photosensitive emulsion.
3. Prepare photosensitive materials : Select the appropriate photosensitive materials according to the printing precision and ink type.
4. Prepare the photosensitive emulsion : Prepare the photosensitive emulsion strictly according to the ratio to ensure the appropriate concentration, as this directly affects the subsequent exposure and development results.

II. Webpage Pre-processing: Ensuring a "Clean and User-Friendly" Webpage
Oil and impurities on the screen printing plate surface will directly affect the adhesion of the photosensitive emulsion, so pretreatment is essential.
1. Clean the screen : Use a special cleaning agent to thoroughly remove oil, dust and residual impurities from the screen.
2. Degreasing treatment : Remove the grease layer on the surface of the screen using chemical or physical methods to allow the photosensitive emulsion to adhere better to the screen.
III. Coating with photosensitive emulsion: Uniformity is key
Applying the photosensitive emulsion is the most demanding step in plate making, as its uniformity directly determines the plate-making accuracy.
1. Determine the coating method : You can choose spraying, scraping, etc. Different methods are suitable for different precision and screen sizes.
2. Control the coating thickness : Ensure that the coating thickness of the photosensitive emulsion is uniform and consistent. Too thick or too thin a coating will affect the subsequent exposure effect.
3. Ensure uniform coating : Pay attention to the speed and pressure during coating to avoid air bubbles and ensure that the photosensitive emulsion forms a smooth film on the screen.


IV. Drying: Precise control of temperature and time
The coated screen needs to be dried. The key to this step is "stability" to avoid excessively high temperatures or prolonged drying time, which could cause the photosensitive emulsion to deteriorate.
1. Select appropriate drying equipment : Select the appropriate drying equipment according to the size of the screen and drying requirements to ensure drying efficiency and quality.
2. Control the drying temperature : Set a reasonable drying temperature to avoid the photosensitive emulsion curing prematurely due to excessively high temperature, or drying incompletely due to excessively low temperature.
3. Control the drying time : Determine the appropriate drying time based on the performance of the drying equipment and the size of the screen to ensure that the photosensitive emulsion is completely dry.
V. Exposure: Engraving the image into the screen print
Exposure is the core step in plate making. Light causes a chemical reaction in the photosensitive emulsion, forming the "skeleton" of the pattern.
1. Determine the exposure parameters : Set appropriate exposure time and intensity according to the type of photosensitive emulsion and the exposure equipment.
2. Place the film : Fit the film tightly against the screen coated with photosensitive emulsion to ensure that the pattern is accurately positioned and does not shift.
3. Perform the exposure operation : Use an exposure machine to expose the image, strictly control the exposure time and intensity, and ensure that the lines of the pattern are clear.
VI. Development: Making the pattern "emerge"
After exposure, the screen needs to be developed to dissolve the unexposed photoresist layer and expose the mesh for printing.
1. Prepare the developer solution : Prepare the developer solution according to the specified ratio to ensure stable development results.
2. Place the screen in the developing solution : Place the exposed screen into the developing solution to allow the unexposed photoresist layer to gradually dissolve.
3. Rinse thoroughly : After development, rinse the screen thoroughly with clean water to ensure there is no residual chemicals, so as to avoid affecting subsequent printing.
VII. Inspection and Repair: Leave no flaw unchecked.
After development, the screen needs to be carefully inspected and any defects repaired promptly to ensure printing quality.
1. Check the plate-making quality : Focus on checking key indicators such as line clarity, dot integrity, and mesh transparency.
2. Repairing defects : Repairing defects such as gaps and uneven edges in the screen printing process to ensure that the screen meets printing requirements.
VIII. Post-processing: Making the screen print "durable and easy to save"
After the screen is made, post-processing can extend the life of the screen and prevent it from being affected by moisture and stains.
1. Drying the screen : The screen is dried again for easy storage and subsequent printing use.
2. Preserve the screen : Store the dried screen properly to avoid moisture and contamination , ensuring it remains stable for the next use.
Every step in screen printing plate making is a contest of precision and detail. From selecting the screen to the final saving, negligence in any step can affect the final printing result.
If you are also in the screen printing industry, or are interested in plate-making processes, you might as well check your own operational details against this process - after all, good printed products are always hidden in the rigor of every step.

The plate exposure machine is a key equipment for plate making. It can precisely expose to ensure the quality of the printing plate.
It is easy to operate and has high efficiency.
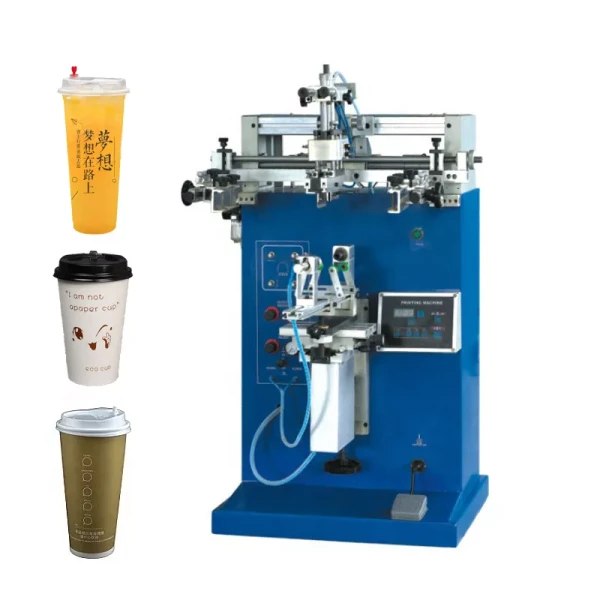
Semi-automatic cylindrical printing machine is suitable for surface printing on cylindrical objects and oval , such as syringe barrel, glass bottle, blow molded bottles, cosmetic tubes, aluminum water bottles, drum sticks, glass pipettes, gas cylinder, milk tea cups, jars etc.

This UV curing machine is suitable for curing UV inks on medical supplies, mobile phone casings, membrane switches, electronic plastic casings, electronic components, LCD panels, terminal sealing, mobile phone component bonding, plastic component bonding, and LCDs.

UV curing machine is mainly used for curing ink on printed products to improve the color fastness of the pattern.

